How to auto archive Outlook 2010, Outlook 2013 and Outlook 2016
Since Outlook 2010, Auto Archive is not enabled by default, though Microsoft Outlook will periodically remind you to do so: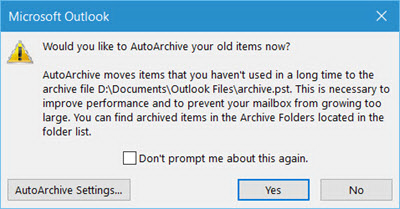
To start archiving immediately, click Yes. To review and probably change the archive options, click AutoArchive Settings….
Or, you can click No to close the prompt, and configure auto archiving later at the time most convenient to you by performing the following steps.
- Open Outlook, and then click File > Options > Advanced > AutoArchive Settings…
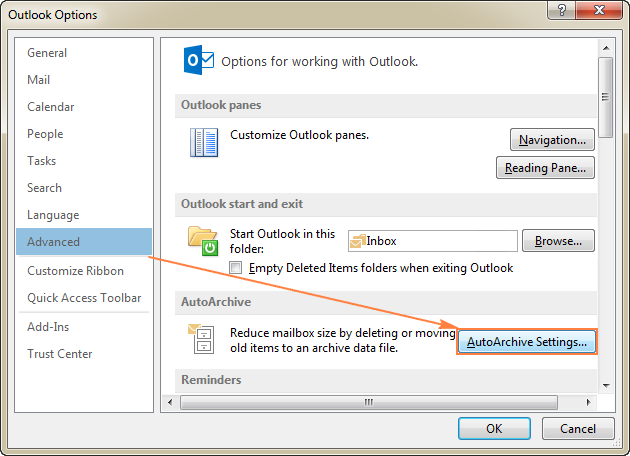
- The AutoArchive dialog window opens, and you will notice that everything is grayed out… but only until you check the Run AutoArchive every N days Once this box is checked, you can configure other options to your liking, and click OK.
The screenshot below shows the default settings,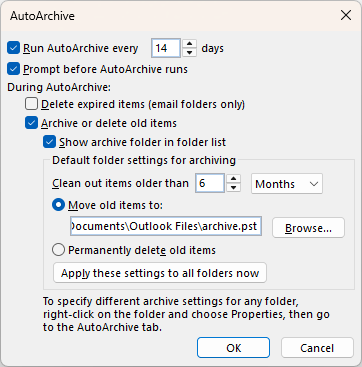
When archiving is in progress, the status information is displayed in the status bar.
As soon as the archive process is completed, the Archives folder will appear in your Outlook automatically, provided you selected the option Show archive folder in the folder list.
How to auto archive Outlook 2007
In Outlook 2007, auto archiving is turned on by default for the following folders:
- Calendar, task and journal items (older than 6 months)
- Sent Items and Deleted Items folders (older than 2 months)
For other folders, such as Inbox, Drafts, Notes and others, you can turn on the AutoArchive feature in this way:
- Open Outlook and click Tools > Options.
- In the Options dialog window, go to the Other tab, and click the AutoArchive… button.
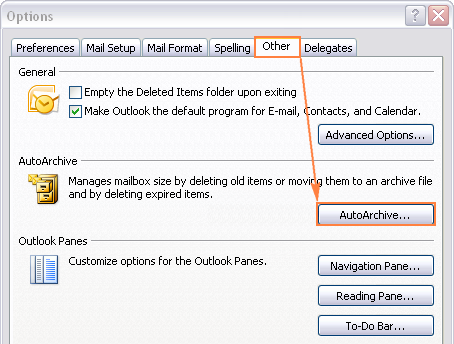
And then, configure the AutoArchive settings as explained below.
Outlook Auto Archive settings and options
As you already know, in Outlook 2010 and later, Auto Archive settings can be accessed via File > Options > Advanced > AutoArchive Settings… The detailed information about each option will help you take the process under your full control.
- Run AutoArchive every N days. Specify how often you want AutoArchive to run. Please keep in mind that archiving many items at a time may slow your computer's performance. So if you receive lots of emails on a daily basis, configure your Outlook Auto Archive to run more frequently. To turn off auto-archiving, clear this box.
- Prompt before AutoArchive runs. Check this box if you want to get a reminder immediately before the auto-archive process starts. This will let you cancel auto archiving by clicking No in the prompt.
- Delete expired items (e-mail folders only). Selecting this option will delete expired messagesfrom your email folders. For the sake of clarity, an expired email is not the same as an old message that has reached the end of its aging period. An expiration date is set for each message individually via the Options tab of the new email window (Options > Tracking group > Expires after).
Microsoft states that this option is not checked by default, but it was checked on some of my Outlook installations. So be sure to uncheck this option if you want to keep expired messages until they reach the end of the aging period set for a given folder.
- Archive or delete old items. Select this option if you want to configure your own auto-archive settings. If unchecked, Outlook will use the default AutoArchive settings.
- Show archive folder in folder list. If you want the Archive folder to appear in the Navigation Pane along with your other folders, select this box. If unselected, you will still be able to open your Outlook archive folder manually.
- Clean out items older than. Specify the aging period after which your Outlook items should be archived. You can configure the period in days, weeks, or months - a minimum of 1 day up to a maximum of 60 months.
- Move old items to. When this option is selected, Outlook automatically moves old emails and other items to the archive.pst file instead of deleting them (selecting this radio button clears the selection of Permanently delete items). By default, Outlook stores the archive.pst file in one of these locations. To choose another location or give another name to the archived .pst, click the Browse button.
- Permanently delete items. This will delete old items permanently as soon as they reach the end of the aging period, no archive copy will be created.
- Apply these settings to all folders now. To apply the configured AutoArchive settings to all folders, click this button. If you want to apply other settings for one or more folders, do not click this button. Instead, configure the archiving settings for each folder manually.
Default aging periods used by Outlook Auto Archive
The default aging periods in all Outlook versions are as follows:
- Inbox, Drafts, Calendar, Tasks, Notes, Journal - 6 months
- Outbox - 3 months
- Sent Items, Deleted Items - 2 months
- Contacts - are not auto archived
The default periods can be changed for each folder individually using the Mailbox Cleanup option.
Outlook determines the age of a particular item based on the following information:
- Emails - the received date or the date when you last changed and saved the message (edited, exported, copied, and so on).
- Calendar items (meetings, events, and appointments) - the date when you last changed and saved the item. Recurring items are not auto archived.
- Tasks - the completion date or the last modification date, whichever is later. Open tasks (tasks that are not marked complete) are not auto archived.
- Notes and journal entries - the date when an item was created or last modified.
How to exclude a specific folder from Auto Archive or apply different settings
To prevent Outlook Auto Archive from running on a certain folder, or set a different schedule and options for that folder, perform the following steps.
- Right click on the folder, and then click Properties… in the context menu.
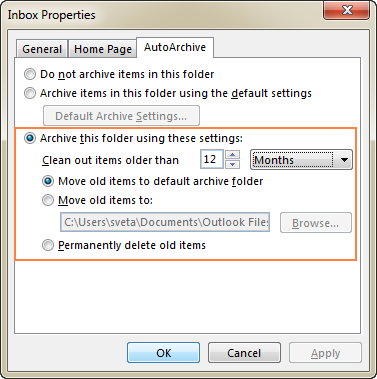
- In the Properties dialog window, do one of the following:
- To exclude the folder from auto archiving, select the Do not archive items in this folderradio box.

- To archive the folder differently, select Archive this folder using these settings, and set up the desired options:
- aging period after which items should be moved to archive;
- whether to use the default archive folder or a different folder, or
- permanently delete old items without archiving.
- Click OK to save the changes.
- To exclude the folder from auto archiving, select the Do not archive items in this folderradio box.
